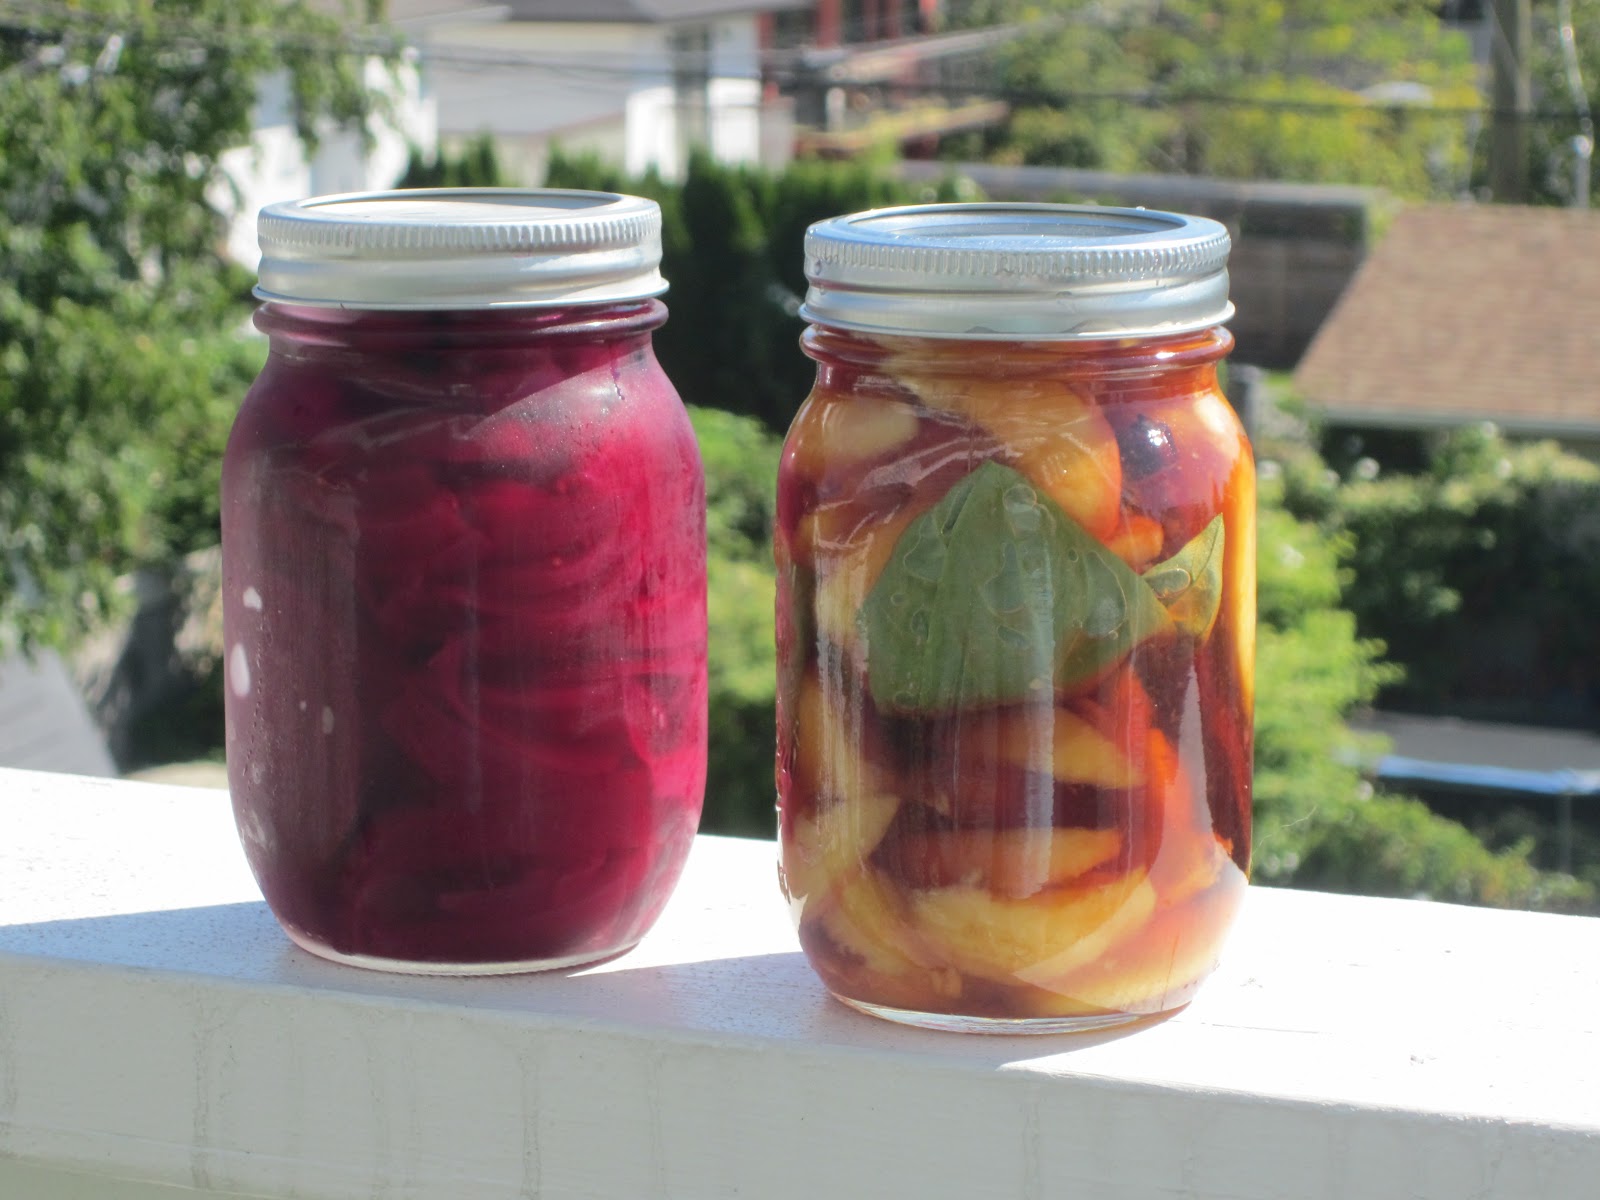
I've always been attracted to food preservation techniques, but haven't actually done much of it in my life. Certainly not on a large scale, anyway. And this trend continues. Being a little overwhelmed by the CSA again this summer, and rarely being home to cook through the abundance, I chose to preserve a few bits and pieces with quick pickling.
First, every single week we've received a gorgeous bunch of beets and a large sweet onion. I love beets - roast 'em, shred 'em, soup 'em, bbq 'em, puree 'em - anyway you slice it, they are delicious. But I don't want them every week. Mostly because they take a lot of effort, and stain everything that even looks at them vibrant pink. So to deal with this, I put a few bunches up as a quick pickle and now we can eat them at a more leisurely pace, even well after the CSA ceases with the beets already, sheesh. I used this recipe at the cooking lessons blog, that calls for both beets and sweet onion. Super easy! Roast beets, peel and slice. Slice onions and tame them in some boiling water. Add veg to jars, make pickle juice and pour it over the veggies. Lid those suckers and put them straight in the fridge. Including roasting the beets, this took me 1.5 hours total. Fridge pickles can last for months and don't require the longer processing that traditional canning calls for. And they are delicious! On a nice dark rye bread with cheese, on top of salad, in a sandwich...lots of possibilities with these fuchsia pickles.
Next I made a batch of spicy pickled peaches! Weird, right? Nope, amazing. I used the recipe on Not Without Salt to pickle sliced, denuded peaches with basil, clove and cinnamon, and a piece of habanero pepper. Holy crap, this is a taste sensation!!! I pickled the peaches on friday morning (it took an hour, what with all the blanching and peeling of peaches), then we left straight away for Edmonton. So last night when we got home I had my first taste of them with goat cheese on artisanal crackers as a late night snack. WOWZERS! They are heat-packed yet have a slippery coolness since coming out of the fridge. Sweet but with an edge of briny pickle. So good!
My beets and onion pickle made 4 cups, in two 500mL jars. The peaches (from three lbs of fruit) made 5 cups, filling two 500mL jars and a 250mL jar. Like I said, this is small scale pickling. But it suits us as we are only two eaters, and I like a highly varied diet. I hope you try some pickling after reading this because it is super, duper easy, and the results are highly worth the small amount of effort you put in. Next up, maybe pickling beans?
20.8.12
30.7.12
22.7.12
Back in the kitchen! With collard rolls
I'm so delighted to be getting back to some of the activities I love that I really didn't have time for while finishing my thesis. I'm cooking again, we're getting a CSA box every week, and it's so fun to be challenged by the random veggies we receive in the box.
Normally at this time of year the local farms are just ramping up for their bigger harvests later in the summe that will include a wide variety of species. Which means that the first few boxes are often greens, greens, and more greens, which sprout early and often and are quite hardy. This year, BC has experienced seriously high water levels and many farms and fields have been flooded. Glen Valley Farm, provider of our CSA, has been strongly affected, and while they are optimistic for the season ahead, they're scrambling to reseed and to harvest any assets that can be taken out at an earlier stage than usual. So our CSA box has had a surprising amount of variety in it so far. We've seen gorgeous new potatoes, kohlrabi, fava beans, young carrots untouched by rust flies, bok choy, and fennel. But of course, there are always the greens. Contending with the overload of greens every summer is a task in and of itself, and requires creativity and perseverance. Because if you can stomach all those amazing phytochemicals and fibre, you will be rewarded later in the harvest with treats like summer squash, green beans (haricots verts to Americans and the French - ha!), and leeks. Yum!
This year is the first year we've received collards in our CSA box. Other than braising it with garlic and something salty (bacon for all you carnivores, soy sauce maybe for us vegetarians), I was looking for new ways to use the broad, flat leaves that are also fairly thick. Scanning food blogs turned up the idea of using collards as wraps instead of tortillas. Some people use them this way raw, and others give the leaves a brief steaming or blanching before using them. I decided to try a baked dish so I opted to blanch them before rolling them up around a yummy ricotta walnut mixture and baking them in a sea of red sauce. It worked really, really well! If we receive collards again this week I'll try them again as a wrap in a different kind of dish because they lend themselves really well to this method, and it helps me to avoid the gluten in flour tortillas or bread that I've developed a bit of sensitivity to.
***I apologise for the crap quality of my photos! I really haven't learned anything about food photography, and my cameras also doesn't seem to be self-producing the right colouring or effects. I'll work on it.***
I used the de-stemming and rolling methods described in the video on Eat Naked Now (tee hee!). Just remove the thickest, toughest stem with a sharp knife, trying to keep the upper part of the leaf in one piece. ENN steams the leaves, but I chose to blanche them because I was already using a pot of boiling water for some accompanying spuds. To blanche the leaves I submerged them two at a time in boiling water for about a minute, then removed them to an ice bath. When they are cool and you're ready to roll, just take them out of the water, shake them off, and make a tidy pile of the leaves laid out with the underside of the leaf up (the veiny side).
In a bowl, combine the ricotta, egg, walnuts and salt. Lay one leaf on your work surface and overlap the lobes of the leaf a little so no gaps are visible. Place a quarter cup or so of ricotta mixture near the stem end of the leaf. Fold the bottom over the ricotta, fold both sides in and over the bottom fold, then roll up all along the leaf so that what you end up with is something like a burrito or cabbage roll. Go see the video I posted to above if you need a little more instruction like I did.
To make the red sauce, I chopped and sauteed half a bulb of fennel, and about half a cup of green onion in olive oil over medium heat. When they were tender I added two roasted red peppers with the skins removed (cut into chunks), and two tomatoes roasted in thick slices then also cut into chunks. Sauteed all that for a minute then added 1/4 cup gin, 1/2 tsp salt, and 1/4 tsp black pepper. Let the veggies simmer until most of the gin is boiled off and that sharp alcohol tang has disappeared. Gin is a very traditional ingredient in Italian cooking, for those of you who are surprised to see it here. The most conventional way of using it is in a light tomato sauce with the freshest of tomatoes lightly crushed and maybe a pinch of fresh oregano or lemon zest. I wanted to add some flavour and liquid to my sauce without adding salt, and the choice of gin resulted in a really tasty and savoury sauce. I blitzed it all in a blender with 1 cup of water. You could definitely use a simple spaghetti sauce in place of a homemade sauce to save on time and effort.
Place the rolled packets in a greased baking dish so they fit snuggly.I poured the sauce liberally over the collard rolls until they were pretty much submerged. This went into a hot oven (uncovered) at 375-400F for about 45 minutes.
Tada! It's like a baked manicotti but absolutely overflowing with healthy veg and immense flavour! The collards really hold up and retain their shape and texture so you get to cut into each roll in a satisfying way, and the ricotta mixture firms up a little bit but stays creamy. In the first image up above you'll see I served two rolls apiece with smashed potatoes. It was nice to have a crunchy starch on the side to help mop up the extra delicious sauce and to add texture to the dish.
Well, that was a long blog, and a long time coming! I'm super happy to be back in the kitchen and back to blogging, so come back soon to see what else I'm getting up to now that the major stress of writing has lifted. Oh yeah, there's still the defence to be stressed about (August 7th!) but I have a few weeks yet to prepare for that one. Thanks for reading! I hope you're all having a fabulous summer!
Normally at this time of year the local farms are just ramping up for their bigger harvests later in the summe that will include a wide variety of species. Which means that the first few boxes are often greens, greens, and more greens, which sprout early and often and are quite hardy. This year, BC has experienced seriously high water levels and many farms and fields have been flooded. Glen Valley Farm, provider of our CSA, has been strongly affected, and while they are optimistic for the season ahead, they're scrambling to reseed and to harvest any assets that can be taken out at an earlier stage than usual. So our CSA box has had a surprising amount of variety in it so far. We've seen gorgeous new potatoes, kohlrabi, fava beans, young carrots untouched by rust flies, bok choy, and fennel. But of course, there are always the greens. Contending with the overload of greens every summer is a task in and of itself, and requires creativity and perseverance. Because if you can stomach all those amazing phytochemicals and fibre, you will be rewarded later in the harvest with treats like summer squash, green beans (haricots verts to Americans and the French - ha!), and leeks. Yum!
This year is the first year we've received collards in our CSA box. Other than braising it with garlic and something salty (bacon for all you carnivores, soy sauce maybe for us vegetarians), I was looking for new ways to use the broad, flat leaves that are also fairly thick. Scanning food blogs turned up the idea of using collards as wraps instead of tortillas. Some people use them this way raw, and others give the leaves a brief steaming or blanching before using them. I decided to try a baked dish so I opted to blanch them before rolling them up around a yummy ricotta walnut mixture and baking them in a sea of red sauce. It worked really, really well! If we receive collards again this week I'll try them again as a wrap in a different kind of dish because they lend themselves really well to this method, and it helps me to avoid the gluten in flour tortillas or bread that I've developed a bit of sensitivity to.
***I apologise for the crap quality of my photos! I really haven't learned anything about food photography, and my cameras also doesn't seem to be self-producing the right colouring or effects. I'll work on it.***
8 or so collard leaves
1 cup ricotta (light is fine)
1 egg, beaten
1/4 cup walnuts, ground fine in a blender
1/4 tsp salt
I used the de-stemming and rolling methods described in the video on Eat Naked Now (tee hee!). Just remove the thickest, toughest stem with a sharp knife, trying to keep the upper part of the leaf in one piece. ENN steams the leaves, but I chose to blanche them because I was already using a pot of boiling water for some accompanying spuds. To blanche the leaves I submerged them two at a time in boiling water for about a minute, then removed them to an ice bath. When they are cool and you're ready to roll, just take them out of the water, shake them off, and make a tidy pile of the leaves laid out with the underside of the leaf up (the veiny side).
In a bowl, combine the ricotta, egg, walnuts and salt. Lay one leaf on your work surface and overlap the lobes of the leaf a little so no gaps are visible. Place a quarter cup or so of ricotta mixture near the stem end of the leaf. Fold the bottom over the ricotta, fold both sides in and over the bottom fold, then roll up all along the leaf so that what you end up with is something like a burrito or cabbage roll. Go see the video I posted to above if you need a little more instruction like I did.
To make the red sauce, I chopped and sauteed half a bulb of fennel, and about half a cup of green onion in olive oil over medium heat. When they were tender I added two roasted red peppers with the skins removed (cut into chunks), and two tomatoes roasted in thick slices then also cut into chunks. Sauteed all that for a minute then added 1/4 cup gin, 1/2 tsp salt, and 1/4 tsp black pepper. Let the veggies simmer until most of the gin is boiled off and that sharp alcohol tang has disappeared. Gin is a very traditional ingredient in Italian cooking, for those of you who are surprised to see it here. The most conventional way of using it is in a light tomato sauce with the freshest of tomatoes lightly crushed and maybe a pinch of fresh oregano or lemon zest. I wanted to add some flavour and liquid to my sauce without adding salt, and the choice of gin resulted in a really tasty and savoury sauce. I blitzed it all in a blender with 1 cup of water. You could definitely use a simple spaghetti sauce in place of a homemade sauce to save on time and effort.
Place the rolled packets in a greased baking dish so they fit snuggly.I poured the sauce liberally over the collard rolls until they were pretty much submerged. This went into a hot oven (uncovered) at 375-400F for about 45 minutes.
Tada! It's like a baked manicotti but absolutely overflowing with healthy veg and immense flavour! The collards really hold up and retain their shape and texture so you get to cut into each roll in a satisfying way, and the ricotta mixture firms up a little bit but stays creamy. In the first image up above you'll see I served two rolls apiece with smashed potatoes. It was nice to have a crunchy starch on the side to help mop up the extra delicious sauce and to add texture to the dish.
Well, that was a long blog, and a long time coming! I'm super happy to be back in the kitchen and back to blogging, so come back soon to see what else I'm getting up to now that the major stress of writing has lifted. Oh yeah, there's still the defence to be stressed about (August 7th!) but I have a few weeks yet to prepare for that one. Thanks for reading! I hope you're all having a fabulous summer!
19.7.12
Vegas trip!
Amazing girls, Dawn, Stacie, and Diedre, whisked me away to Vegas to celebrate submitting my dissertation and many years of friendship. If this is the start of an annual girls' trip, I am SO IN!
And here are a few of the best shots as still photos so you can linger over them. :-)
5.3.12
Comedy Break!
23.2.12
Cooking challenge, an update
Well folks, I threw down the gauntlet a couple weeks ago. I asked you all to try something new, be daring in the kitchen, and meet the following challenge:
1) Click the Surprise Me! button on Smitten Kitchen three times. Choose one of the three recipes and either make it or use it to inspire your own new dish.
2) Choose the third book from the left on your cookbook shelf and make the recipe on page 58 of that book (or the recipe nearest to page 58).
Did you do it? I heard a lot from people who wanted to participate, who had even chosen a recipe. My sister made the Smitten Kitchen olive and artichoke crostini and posted about it. I know time is tight and the last thing you need is one more thing on your to-do list, but she's go two kids, a bungalow, and she lives in Edmonton people! There's an ass load of snow to shovel there. Still, there's nothing like experimenting in the kitchen. At least for me it's a very relaxing and invigorating space, and the results are not always edible but unerringly interesting because I learn something about technique or about a new ingredient, and I carry that forward into future cooking. I hope you did find time, or will in the next few days, to join in on this challenge. When you've found the time, make a few more minutes to let me/us know how it went. What was the original recipe and if you deviated from it, how? Results? Good times? Do over? Recommendations?
Here's my contribution to the challenge. I don't really remember the other two options, but I clearly remember my eyebrows hitting the ceiling when my Surprise me! landed on 44 clove garlic soup. Whoa. Like, really whoa. That's a lotta garlic. And I like garlic! In our house, the alium family is king! That's anything in the onion family, and garlic is a family member who gets invited to almost every meal around here. He might be stinky and obstinate, but he really comes into his own around smoky red wines and juicy tomatoes - both of which are rampant in our kitchen. So hells YES I'm going to make 44 clove garlic soup!
In preparation for this endeavour, I bought a bag full of garlic. Go ahead, go out there and try this. Watch how NO ONE blinks when you buy a BAG FULL of garlic. I suppose their processing doesn't extend to calculate what your apartment in an old house with shared forced air heating will smell like for days after you bring home that BAG FULL OF GARLIC and roast the hell out of lots of it. They probably aren't expecting you to use the entire BAG FULL OF GARLIC in one pot, let alone one dish. They probably haven't got a clue what you'll smell like the day after you make the entire bag of garlic into one, single, four-bowl soup. Until they sit next to you on the bus. Or the ferry. Or the lunch table at work.
What can I say except that this soup is really, really tasty, and needs to be eaten on a Friday morning at daybreak when you have a long weekend so that, with any luck, 80% of the garlic potency will be worn off by the time you go to work on Tuesday after a late morning (I did say long weekend!). Or, should you be hiring a cat sitter for the weekend, this soup should not be made. I made the soup this afternoon and my poor cat sitter almost passed out from the fumes when she came to pick up the keys at 5pm. I promised her the odour would be gone for the weekend but all windows open, candles lighted, hood fan whirring at top speed, and me applying toothpaste liberally to all solid surfaces doesn't seem to be helping. Someone please come check on my cat sitter (and my cats!) on Saturday morning in case a contagious case of garlic intoxication by inhalation has occurred!
On to the soup. You will be surprised to learn that it is a subtle and creamy flavour in the SOUP THAT SHALL DETONATE NEIGHBOURHOODS. Roast 28, yes 28 - I counted - cloves of garlic with olive oil until gorgeously silky soft, then help them shed their skins. Cook down lots of onions in butter. Add 16 more raw cloves of garlic to the pot, and a peeled, chopped potato for extra soup body. Saute a bit. Add the roasted garlic silkyness and 3-4 cups water or broth, and a large pinch of dried thyme. Bring to a boil, then simmer 20 minutes. Attempt to tame this beast into submission with an immersion blender, only to realize that while the soup tastes and looks like an elegant starter dish only served at the snottiest of French restaurants, your apartment is uninhabitable by anyone but you; you can only tolerate this environment because you became slowly acclimated while the garlic was roasting. Add whipping cream to the soup (the second dairy sin of this recipe, unneeded but sure, what the hell).
Using your essential microplane, finely grate parmesan over the soup.
Drink the soup.
Listen, this thing is no beauty. I won't even apologise for my pathetic camera skills. Enough to say that this beige dish of Jane Eyre isn't winning any beauty contests, but she's a major winner in the personality category. We devoured...no, actually, we really savoured this with some toasted open-faced sandwiches a la Stieg Larsson. It's a subtle flavour. Not so subtle that you would miss it being garlicky to the max, but subtle as in mild. Creamy. Delicious. Puddles of unctuous beige matter. And you know what, on an otherwise uneventful Thursday night, who could ask for anything more?
1) Click the Surprise Me! button on Smitten Kitchen three times. Choose one of the three recipes and either make it or use it to inspire your own new dish.
2) Choose the third book from the left on your cookbook shelf and make the recipe on page 58 of that book (or the recipe nearest to page 58).
Did you do it? I heard a lot from people who wanted to participate, who had even chosen a recipe. My sister made the Smitten Kitchen olive and artichoke crostini and posted about it. I know time is tight and the last thing you need is one more thing on your to-do list, but she's go two kids, a bungalow, and she lives in Edmonton people! There's an ass load of snow to shovel there. Still, there's nothing like experimenting in the kitchen. At least for me it's a very relaxing and invigorating space, and the results are not always edible but unerringly interesting because I learn something about technique or about a new ingredient, and I carry that forward into future cooking. I hope you did find time, or will in the next few days, to join in on this challenge. When you've found the time, make a few more minutes to let me/us know how it went. What was the original recipe and if you deviated from it, how? Results? Good times? Do over? Recommendations?
Here's my contribution to the challenge. I don't really remember the other two options, but I clearly remember my eyebrows hitting the ceiling when my Surprise me! landed on 44 clove garlic soup. Whoa. Like, really whoa. That's a lotta garlic. And I like garlic! In our house, the alium family is king! That's anything in the onion family, and garlic is a family member who gets invited to almost every meal around here. He might be stinky and obstinate, but he really comes into his own around smoky red wines and juicy tomatoes - both of which are rampant in our kitchen. So hells YES I'm going to make 44 clove garlic soup!
| The obligatory ingredients shot. |
What can I say except that this soup is really, really tasty, and needs to be eaten on a Friday morning at daybreak when you have a long weekend so that, with any luck, 80% of the garlic potency will be worn off by the time you go to work on Tuesday after a late morning (I did say long weekend!). Or, should you be hiring a cat sitter for the weekend, this soup should not be made. I made the soup this afternoon and my poor cat sitter almost passed out from the fumes when she came to pick up the keys at 5pm. I promised her the odour would be gone for the weekend but all windows open, candles lighted, hood fan whirring at top speed, and me applying toothpaste liberally to all solid surfaces doesn't seem to be helping. Someone please come check on my cat sitter (and my cats!) on Saturday morning in case a contagious case of garlic intoxication by inhalation has occurred!
On to the soup. You will be surprised to learn that it is a subtle and creamy flavour in the SOUP THAT SHALL DETONATE NEIGHBOURHOODS. Roast 28, yes 28 - I counted - cloves of garlic with olive oil until gorgeously silky soft, then help them shed their skins. Cook down lots of onions in butter. Add 16 more raw cloves of garlic to the pot, and a peeled, chopped potato for extra soup body. Saute a bit. Add the roasted garlic silkyness and 3-4 cups water or broth, and a large pinch of dried thyme. Bring to a boil, then simmer 20 minutes. Attempt to tame this beast into submission with an immersion blender, only to realize that while the soup tastes and looks like an elegant starter dish only served at the snottiest of French restaurants, your apartment is uninhabitable by anyone but you; you can only tolerate this environment because you became slowly acclimated while the garlic was roasting. Add whipping cream to the soup (the second dairy sin of this recipe, unneeded but sure, what the hell).
Using your essential microplane, finely grate parmesan over the soup.
Drink the soup.
Listen, this thing is no beauty. I won't even apologise for my pathetic camera skills. Enough to say that this beige dish of Jane Eyre isn't winning any beauty contests, but she's a major winner in the personality category. We devoured...no, actually, we really savoured this with some toasted open-faced sandwiches a la Stieg Larsson. It's a subtle flavour. Not so subtle that you would miss it being garlicky to the max, but subtle as in mild. Creamy. Delicious. Puddles of unctuous beige matter. And you know what, on an otherwise uneventful Thursday night, who could ask for anything more?
We're going away for the weekend in the morning (Huzzah!) and I'm already looking forward to a bowl of this golden blanket when we return Sunday night. I completely agree with Ruth Reichl, quoted by Deb Perelman in the original post, that "If everyone ate more garlic, the world would be a happier place." Except for garlic plants, my friends. Think of the garlic plants.
Then make this soup.
And please, send me your own forays into this cooking challenge. If you want to write a guest post, I'm all for it! If you want to leave a comment with your adventures, please do so. C'mon, man. Just participate.
18.2.12
Things I like to put in my mouth
Stop thinking that, you dirty buggers!
L-boogie asked me recently what interesting food I'd been up to since we last talked. I really didn't have an answer for her, even though we had eaten at home all week. So I must have been making something, but I honestly couldn't think of what we had been feeding ourselves with, and it very likely wasn't novel, delicious, or exciting. Of course, the moment we parted company I realized that I hadn't thought to share my most recent food project - I've been baking my own bread for weeks now!
My dad is an amazing baker. It's a hobby he took up a few years ago now, mostly out of frustration with work because bread kneading is a fantastic way to release stress, and the patience required to see a recipe through is also meditative. The products of his labour are now hotly requested, and a day at their home that promises steaming bread fresh from the oven is a day when I feel mightily spoiled. I don't have the dedication to purity that he has, in terms of following a recipe to the letter, nor the patience he displays, so my own forays into bread making were bound to be a little more mucky than his. But I recently jumped right in!
A couple years ago I got Healthy Bread In 5 Minutes A Day by Jeff Hertzberg and Zoe Francois out of the library. They have a terrific system that is very, very like the No Knead bread craze that's been sweeping the system lately (also see Katie's great post on no knead bread). In the 5 Minutes A Day books, you mix a few ingredients briefly in a large container with a lid, then toss the whole thing in the fridge, and remove only as much as you want for your next loaf. Seriously hands off, easy peasy stuff. And the bread is really decent. But for some reason I waned off it pretty quickly, only trying 4 or 5 recipes from the healthy book and their original book, Artisan Breads In 5 Minutes A Day. I don't know, maybe there was something about the longer term commitment to having four loaves on the go all the time... I couldn't really say, but I didn't keep it up for long and was soon back to buying sliced sandwich bread at the grocery store.
Then three weeks ago, I found a very simply recipe for baguette at Epicurious, and decided to give it a go. I now have a stand mixer so I'm not wearing myself out with kneading but the gluten and yeast do get a work out in this recipe. Since trying the recipe as written the first time, I've since made at least another 5 batches, with variations imagined up by me every time. I've played with subbing some whole wheat flour for some of the white bread flour; I've moved away from baguette shapes completely; I've added rosemary and asiago; I've tossed in a couple tablespoons of 7-grain mix; I made a whole wheat version with added dried herbs (dill, rosemary, thyme); all the while also experimenting with how many rises, how much cycled kneading (like a second knead or not), how long each rise lasts, and I even tried retarding the dough in the fridge once. Tonight though, oh tonight. I returned (almost) to the original recipe, and added rosemary in the first knead, chopped olives in the second knead, and really limited each rise cycle. This bread is the bomb.
The loaf turned out to be almost a foot long with fantastic rise and a surprisingly chewy but firm crust. I definitely could have worked the olives through the dough more, but I was afraid to overwork it and deflate the first rise completely. In any case, the little pits of black saltiness gel perfectly with the mellow meatiness of the body of the loaf, and with the aromatic rosemary that permeates throughout. I'm frickin impressed with myself, and I feel like if you give this recipe a try (or possibly a couple tries to get the feel for it) you'll be impressed with yourself too! Follow the link to the original recipe above, or try the adjusted recipe I made today. It's down below, but before I get to that I also want to talk about the other reason wheat exists: beer.
My friend Jules was so super excited to try a specific beer last night when the gang were all out at Alibi Room. This place is the best, absolute best, place for beer in the city. They have I don't even know how many taps and the list is constantly changing. They get local stuff, exotic stuff, unheard of stuff, and impossible to find or never ever imagined having on tap stuff. Magic. But what they didn't have last night is the newest beer from Driftwood. Apparently their latest nectar is a Russian Imperial Stout called Singularity, and it allegedly sold out on all of Main Street in 24 hours! When Rocco and I spotted it at our local liquor store this afternoon we had to try it out. It's a whopper at 11.6%, which, paired with its instant popularity, explains the $12 price tag for a 650mL bottle. But who can resist a beer with the tagline "Beer of infinite density", that is sealed with black wax?! This stuff is aged in Kentucky bourbon barrels, fergoodnesssakes.
As you can see in the photo, it's black as death. The taste is malty and sweet, and a little bit sour on the finish. It's a smooth, smooth stout with really rich mouth feel(see Note below). I couldn't have a second pint of this stuff, not least because it would send me under the table but also because it's got such a huge flavour that I was sated almost instantly. Needed some water and some bread, a little something to rinse it all out. But hell yes it's a beautiful beer. If you get a chance, give it a taste and let me know what you think of it. Please describe the mouth feel in great detail.
Meg's rustic rosemary and olive loaf
1 cup tepid water (skin temp)
1 tsp sugar
1 tsp active dry yeast
3 cups bread flour (I think all purpose flour would be fine, but the texture will be less chewy)
1 tsp salt
1 tsp dried rosemary
1 scant cup olives, roughly chopped
sea salt for dusting
1) In a large mixing bowl or the bowl of your stand mixer, stir the sugar into the water. Sprinkle the mixture with yeast so that it covers the surface. Let this new group of friends get to know one another for about 5 minutes. You will probably see a frothy party happening when you return to the bowl, but if you don't, have no fear and move forward*.
2) Add 1.5 cups of the flour to the yeast mixture and stir to incorporate. Put your dough hook on the stand mixer, add the salt, rosemary, and remaining flour, and let the mixer knead (low speed) for about 6 minutes**. This should result in a cohesive ball that seems a bit elastic and probably quite dense. Put a couple Tablespoons of oil in a large clean bowl and rub it all around the bowl. Drop in your dough ball and turn the ball until the dough is also coated in oil. Cover this bowl tightly with plastic wrap and tuck it away in a warm, dark corner of your home. For us, under our kitchen sink gets pretty toasty because of some weird heating vent arrangements, but you might have a closet that gets warm next to the dryer, or a shelf near your water heater that will work.
3) Let the dough rise for at least a few hours. Today mine rose for 5 hours. Prepare your baking pan with parchment paper, then remove the plastic wrap from the bowl. Add your olives, then fold and pull and fold and pull the dough to incorporate the olives. This is not a serious kneading as you don't want to deflate the dough, but you do want to rough it up a little. When you feel like they're mixed in enough, start shaping the dough by pulling it into a ball and folding the sides around and under. This forms a stretched band around the outside of the dough ball, and gathers all the edges into a messy seam on the bottom of the loaf. Shape it into an oblong, and place it on your prepared baking sheet. This then goes back into the warm place for another couple of hours.
4) One half hour before you will bake the bread, place a pan of water an inch deep on the bottom rack of your oven and turn it on to 500F. This will build up steam in the oven which is essential for forming a nice crust. When it has heated for a half hour, dust the dough with a little sea salt, then slam it in the hot oven on a middle rack. Leave the heat high for 5 minutes, then turn it down to 425F for 20 to 25 minutes.
5) Your bread is done when the crust is a gorgeous brown and the loaf sounds hollow when you tap the bottom. Remove it to a rack immediately and be strong, my friend. Wait AT LEAST 20 MINUTES before cutting into it because the residual heat continues to cook the centre of the loaf.
Note: Don't worry, I just threw up in my mouth a little at using "mouth feel" to talk about a beer. I'm sure a poncy dork, but at least I'm reflexive. You know you love me.
*Yeast dies. Check the date on your yeast and if the bread turns out to be a flop, it is almost certainly due to old yeast. Simple solution.
**Do it by hand without a mixer! First off, reduce the overall amount of flour you add by half a cup. Hand knead the dough for at least 5 minutes, probably more, on a floured surface and adding more flour as necessary. The dough should be smooth and elastic when you're done. Kneading for longer than you think is necessary helps the gluten strands activate and builds the imposing forearms of a Russian imperial stout drinker.
L-boogie asked me recently what interesting food I'd been up to since we last talked. I really didn't have an answer for her, even though we had eaten at home all week. So I must have been making something, but I honestly couldn't think of what we had been feeding ourselves with, and it very likely wasn't novel, delicious, or exciting. Of course, the moment we parted company I realized that I hadn't thought to share my most recent food project - I've been baking my own bread for weeks now!
My dad is an amazing baker. It's a hobby he took up a few years ago now, mostly out of frustration with work because bread kneading is a fantastic way to release stress, and the patience required to see a recipe through is also meditative. The products of his labour are now hotly requested, and a day at their home that promises steaming bread fresh from the oven is a day when I feel mightily spoiled. I don't have the dedication to purity that he has, in terms of following a recipe to the letter, nor the patience he displays, so my own forays into bread making were bound to be a little more mucky than his. But I recently jumped right in!
A couple years ago I got Healthy Bread In 5 Minutes A Day by Jeff Hertzberg and Zoe Francois out of the library. They have a terrific system that is very, very like the No Knead bread craze that's been sweeping the system lately (also see Katie's great post on no knead bread). In the 5 Minutes A Day books, you mix a few ingredients briefly in a large container with a lid, then toss the whole thing in the fridge, and remove only as much as you want for your next loaf. Seriously hands off, easy peasy stuff. And the bread is really decent. But for some reason I waned off it pretty quickly, only trying 4 or 5 recipes from the healthy book and their original book, Artisan Breads In 5 Minutes A Day. I don't know, maybe there was something about the longer term commitment to having four loaves on the go all the time... I couldn't really say, but I didn't keep it up for long and was soon back to buying sliced sandwich bread at the grocery store.
Then three weeks ago, I found a very simply recipe for baguette at Epicurious, and decided to give it a go. I now have a stand mixer so I'm not wearing myself out with kneading but the gluten and yeast do get a work out in this recipe. Since trying the recipe as written the first time, I've since made at least another 5 batches, with variations imagined up by me every time. I've played with subbing some whole wheat flour for some of the white bread flour; I've moved away from baguette shapes completely; I've added rosemary and asiago; I've tossed in a couple tablespoons of 7-grain mix; I made a whole wheat version with added dried herbs (dill, rosemary, thyme); all the while also experimenting with how many rises, how much cycled kneading (like a second knead or not), how long each rise lasts, and I even tried retarding the dough in the fridge once. Tonight though, oh tonight. I returned (almost) to the original recipe, and added rosemary in the first knead, chopped olives in the second knead, and really limited each rise cycle. This bread is the bomb.
The loaf turned out to be almost a foot long with fantastic rise and a surprisingly chewy but firm crust. I definitely could have worked the olives through the dough more, but I was afraid to overwork it and deflate the first rise completely. In any case, the little pits of black saltiness gel perfectly with the mellow meatiness of the body of the loaf, and with the aromatic rosemary that permeates throughout. I'm frickin impressed with myself, and I feel like if you give this recipe a try (or possibly a couple tries to get the feel for it) you'll be impressed with yourself too! Follow the link to the original recipe above, or try the adjusted recipe I made today. It's down below, but before I get to that I also want to talk about the other reason wheat exists: beer.
My friend Jules was so super excited to try a specific beer last night when the gang were all out at Alibi Room. This place is the best, absolute best, place for beer in the city. They have I don't even know how many taps and the list is constantly changing. They get local stuff, exotic stuff, unheard of stuff, and impossible to find or never ever imagined having on tap stuff. Magic. But what they didn't have last night is the newest beer from Driftwood. Apparently their latest nectar is a Russian Imperial Stout called Singularity, and it allegedly sold out on all of Main Street in 24 hours! When Rocco and I spotted it at our local liquor store this afternoon we had to try it out. It's a whopper at 11.6%, which, paired with its instant popularity, explains the $12 price tag for a 650mL bottle. But who can resist a beer with the tagline "Beer of infinite density", that is sealed with black wax?! This stuff is aged in Kentucky bourbon barrels, fergoodnesssakes.
As you can see in the photo, it's black as death. The taste is malty and sweet, and a little bit sour on the finish. It's a smooth, smooth stout with really rich mouth feel(see Note below). I couldn't have a second pint of this stuff, not least because it would send me under the table but also because it's got such a huge flavour that I was sated almost instantly. Needed some water and some bread, a little something to rinse it all out. But hell yes it's a beautiful beer. If you get a chance, give it a taste and let me know what you think of it. Please describe the mouth feel in great detail.
Meg's rustic rosemary and olive loaf
1 cup tepid water (skin temp)
1 tsp sugar
1 tsp active dry yeast
3 cups bread flour (I think all purpose flour would be fine, but the texture will be less chewy)
1 tsp salt
1 tsp dried rosemary
1 scant cup olives, roughly chopped
sea salt for dusting
1) In a large mixing bowl or the bowl of your stand mixer, stir the sugar into the water. Sprinkle the mixture with yeast so that it covers the surface. Let this new group of friends get to know one another for about 5 minutes. You will probably see a frothy party happening when you return to the bowl, but if you don't, have no fear and move forward*.
2) Add 1.5 cups of the flour to the yeast mixture and stir to incorporate. Put your dough hook on the stand mixer, add the salt, rosemary, and remaining flour, and let the mixer knead (low speed) for about 6 minutes**. This should result in a cohesive ball that seems a bit elastic and probably quite dense. Put a couple Tablespoons of oil in a large clean bowl and rub it all around the bowl. Drop in your dough ball and turn the ball until the dough is also coated in oil. Cover this bowl tightly with plastic wrap and tuck it away in a warm, dark corner of your home. For us, under our kitchen sink gets pretty toasty because of some weird heating vent arrangements, but you might have a closet that gets warm next to the dryer, or a shelf near your water heater that will work.
3) Let the dough rise for at least a few hours. Today mine rose for 5 hours. Prepare your baking pan with parchment paper, then remove the plastic wrap from the bowl. Add your olives, then fold and pull and fold and pull the dough to incorporate the olives. This is not a serious kneading as you don't want to deflate the dough, but you do want to rough it up a little. When you feel like they're mixed in enough, start shaping the dough by pulling it into a ball and folding the sides around and under. This forms a stretched band around the outside of the dough ball, and gathers all the edges into a messy seam on the bottom of the loaf. Shape it into an oblong, and place it on your prepared baking sheet. This then goes back into the warm place for another couple of hours.
4) One half hour before you will bake the bread, place a pan of water an inch deep on the bottom rack of your oven and turn it on to 500F. This will build up steam in the oven which is essential for forming a nice crust. When it has heated for a half hour, dust the dough with a little sea salt, then slam it in the hot oven on a middle rack. Leave the heat high for 5 minutes, then turn it down to 425F for 20 to 25 minutes.
5) Your bread is done when the crust is a gorgeous brown and the loaf sounds hollow when you tap the bottom. Remove it to a rack immediately and be strong, my friend. Wait AT LEAST 20 MINUTES before cutting into it because the residual heat continues to cook the centre of the loaf.
Note: Don't worry, I just threw up in my mouth a little at using "mouth feel" to talk about a beer. I'm sure a poncy dork, but at least I'm reflexive. You know you love me.
*Yeast dies. Check the date on your yeast and if the bread turns out to be a flop, it is almost certainly due to old yeast. Simple solution.
**Do it by hand without a mixer! First off, reduce the overall amount of flour you add by half a cup. Hand knead the dough for at least 5 minutes, probably more, on a floured surface and adding more flour as necessary. The dough should be smooth and elastic when you're done. Kneading for longer than you think is necessary helps the gluten strands activate and builds the imposing forearms of a Russian imperial stout drinker.
13.2.12
Thank you, thanks, thnx, thx
Found a very sweet blog today. Here's the background: "Leah Dieterich's mother always told her to write thank you notes. So she
does. To everything. thxthxthx is her daily exercise in gratitude."
And here are a couple good Thank Yous. Check her site daily for a hit of unexpected gratitude. My hope is this make us all a little more grateful for small and large moments of goodness.
Now quick quick go to thxthxthx to find more endearingly honest notes of gratitude. And here's a hint, browse by subjects listed in the right sidebar. I hope, like me, you'll be constantly surprised at the connections she makes, and the insight she has into the universal experience.
And here are a couple good Thank Yous. Check her site daily for a hit of unexpected gratitude. My hope is this make us all a little more grateful for small and large moments of goodness.
Now quick quick go to thxthxthx to find more endearingly honest notes of gratitude. And here's a hint, browse by subjects listed in the right sidebar. I hope, like me, you'll be constantly surprised at the connections she makes, and the insight she has into the universal experience.
1.2.12
Storm the kitchen!
A challenge for anyone who still reads this blog! I figure there might be a small handful of you out there. Maybe. Are ya? Hmm. Well, this should let me know.
My lil' sis is having a hard time finding her mojo back in the kitchen, which I suspect might be a result of crazy amounts of cooking and baking she took on over the holiday season (this suspicion has not yet been confirmed). So she asked for a challenge that might help get her fired up again. Even better, thought I, let's all do this together!
Choose one of two options:
1) Go to Smitten Kitchen and click Surprise me! on the left sidebar three times. Of those three recipes, choose one to make as directed or to inspire your own version of SK's dish.
2) Look at your cookbook shelf. Choose the third book from the left. Go to page 58 (or whatever recipe is closest to page 58 if you hit a photo page or section break). Make that recipe as directed or use it as inspiration for your own dish.
Then get your butt back here and let me know how it went and what you made. If you used a SK recipe, post to the original and tell us what you did with it, and if you used a cookbook then let me know the title of the book and the original recipe, and what you did with it.
Fun! Bringing the mojo back to your kitchen, one challenge at a time.
On a related note, I recently found a new-to-me food blog that I'm falling in love with. Not Without Salt is written by a mom living in Seattle who put in serious time on the way to becoming a pastry chef in the best restaurants in the US, and now she moms-it-up, and blogs about both sweet and savoury delectables. Recently I made her lime and jalapeno marinated kale tostadas (except I used swiss chard in place of kale and had no avocado, and used chevre in place of the Mexican cheese). Mindblowingly good. To die for stuff. I already know I'll be craving them again within days so I'd better stock up on tortillas and tequila (for the accompanying margarita, of course). Go check her out!
UPDATE: Quick note, Katho is posting about this on her blog too, which I'm hoping means we'll have lots of participants and lots of reports on recipes tried. Hooray!
My lil' sis is having a hard time finding her mojo back in the kitchen, which I suspect might be a result of crazy amounts of cooking and baking she took on over the holiday season (this suspicion has not yet been confirmed). So she asked for a challenge that might help get her fired up again. Even better, thought I, let's all do this together!
Choose one of two options:
1) Go to Smitten Kitchen and click Surprise me! on the left sidebar three times. Of those three recipes, choose one to make as directed or to inspire your own version of SK's dish.
2) Look at your cookbook shelf. Choose the third book from the left. Go to page 58 (or whatever recipe is closest to page 58 if you hit a photo page or section break). Make that recipe as directed or use it as inspiration for your own dish.
Then get your butt back here and let me know how it went and what you made. If you used a SK recipe, post to the original and tell us what you did with it, and if you used a cookbook then let me know the title of the book and the original recipe, and what you did with it.
Fun! Bringing the mojo back to your kitchen, one challenge at a time.
On a related note, I recently found a new-to-me food blog that I'm falling in love with. Not Without Salt is written by a mom living in Seattle who put in serious time on the way to becoming a pastry chef in the best restaurants in the US, and now she moms-it-up, and blogs about both sweet and savoury delectables. Recently I made her lime and jalapeno marinated kale tostadas (except I used swiss chard in place of kale and had no avocado, and used chevre in place of the Mexican cheese). Mindblowingly good. To die for stuff. I already know I'll be craving them again within days so I'd better stock up on tortillas and tequila (for the accompanying margarita, of course). Go check her out!
UPDATE: Quick note, Katho is posting about this on her blog too, which I'm hoping means we'll have lots of participants and lots of reports on recipes tried. Hooray!
15.1.12
Salmonella's no joke.
After taking a little abuse about not posting enough, I triumphantly return with a little time waster. Check out Harto on Youtube. She's relatively hilarious. She likes to drink, and she's not picky about what she's drinking. She also likes to cook. She MOST likes to combine the two. The result is her minor intertubes sensation, My Drunk Kitchen.
You don't have to watch them in order, and in fact they get better as she gains experience. I haven't watched all of them yet but here are a few of my favourites from those I have watched.
Episode 10: Poutine, in which Harto visits New York of the North, licks gravy from her laptop and mocks our noble moose.
Episode 5: Smashed Brothers, in which Harto mocks Grandmas and participates in MOAR DRINKING.
Episode 4: Not Easy, Bake Oven, in which Harto intelligently recruits supervision while using the oven to make cookies. Or are they biscuits?
Mostly these vids make me think fondly of drunken times with the Duchess. I have twin scars on my wrists from baking tater tots and McCain ovenbaked fries while wasted. Those scars and hazy memories will stay with me for life. Also, Miranda is this your gal friend Jesse? Totally could be. That would be even MOAR hilarious.
You don't have to watch them in order, and in fact they get better as she gains experience. I haven't watched all of them yet but here are a few of my favourites from those I have watched.
Episode 10: Poutine, in which Harto visits New York of the North, licks gravy from her laptop and mocks our noble moose.
Episode 5: Smashed Brothers, in which Harto mocks Grandmas and participates in MOAR DRINKING.
Episode 4: Not Easy, Bake Oven, in which Harto intelligently recruits supervision while using the oven to make cookies. Or are they biscuits?
Mostly these vids make me think fondly of drunken times with the Duchess. I have twin scars on my wrists from baking tater tots and McCain ovenbaked fries while wasted. Those scars and hazy memories will stay with me for life. Also, Miranda is this your gal friend Jesse? Totally could be. That would be even MOAR hilarious.
12.12.11
The Lethbridge Veg
I'm so glad my little sister is blogging! She keeps feeding me new recipes to try, and passing on great blogs and other items she has found along her blogging travels.
Great news for Lethbridgians, Katho found a blog by a Lethbridge woman who is into growing her own food year round, preserving and canning, local producers, and vegetarian eating in Southern Alberta (not a simple thing to accomplish). The author's husband eats meat so some of her blog posts also include references to local meat producers who are doing things the ethical and organic way. Check it out over at The Lethbridge Veg. I was most impressed to see her listing interesting workshops happening in the Lethbridge area and pointing her readers to local independent businesses where you can buy food products you can feel good feeding to your friends and family.
Thanks for the tip, Katho!
Great news for Lethbridgians, Katho found a blog by a Lethbridge woman who is into growing her own food year round, preserving and canning, local producers, and vegetarian eating in Southern Alberta (not a simple thing to accomplish). The author's husband eats meat so some of her blog posts also include references to local meat producers who are doing things the ethical and organic way. Check it out over at The Lethbridge Veg. I was most impressed to see her listing interesting workshops happening in the Lethbridge area and pointing her readers to local independent businesses where you can buy food products you can feel good feeding to your friends and family.
Thanks for the tip, Katho!
9.12.11
Seasonal fun
I've been able to squeeze in a little seasonal fun lately, in between committee meetings and chapter revisions. Por ejemplo: introducing a new person to what we call snowshoeing.
And the best part of the holiday season, which can also be accomplished any time of year and was also a part of snowshoeing, spending time with good friends.
So strange that I didn't foresee that night at the Alibi Room to be a big night. But oh, it was. And such a fun time was had by all!
| Miranda and Jacobus on frozen trail |
| The snowshoe crew, some of whom look more suspicious than others |
| You might think this was taken when it was getting on later in the evening. But no. Still fairly early in the grand scheme of things. |
1.12.11
Namaste
27.11.11
Nothing like kicking around an empty tortilla bag to break a girl's pride
Another blog in response! Abaw posted a great sounding recipe for enchiladas, and I tried them tonight with, as she proposes, "anything you like" tossed in. Well I found myself with a festival squash, a red pepper, a can of black beans, and a bunch of cilantro. And by golly, they were soooo delicious. Here's what I did and what you can do if you want to recreate what I did:
Halve squash, rub with olive oil, place cut side down on baking tray and roast at 400F for 40 minutes.
Meanwhile, saute chopped onion, red pepper, and garlic in 2tsp olive oil over medium heat until veggies are translucent, then add 1 tsp cumin, 1 tsp chili powder, 1/2 tsp red chili flakes.
In a large bowl, mix together:
1/2 cup cottage cheese
1/2 cup salsa
1 small can black beans rinsed and drained (14oz maybe?)
1/4 cup chopped cilantro
1/4 cup corn (frozen then thawed)
sauteed veggies
flesh from half the roasted squash (discard skin)
I used fajita size flour tortillas, and greased a 9X13ish baking pan.
Place a bunch of mixture into a tortilla, roll up and put seam side down into the baking pan. Repeat. Mine made seven rolls but I definitely could have filled them less to make more rolls.
Pour some enchilada sauce from a jar (yep, you read that right) across the tortilla rolls, mostly down the middle and leaving the very ends of the rolls dry. Sprinkle the sauce with enough cheese to satisfy you.
Cover with foil and back at 350F for 30 minutes. Remove foil and bake another 10 minutes.
Ooooooh yeah! We'll be making these again, and soon! It should be said that I had a minor catastrophe with a pack of corn tortillas at first, which resulted in me cursing repeatedly and drop-kicking the empty bag of useless, crumbly, asswipe corn tortillas, which only resulted in greater frustration since an empty plastic tortilla bag really doesn't feel the brunt of a forceful drop-kick motivated by sincere anger. Suffice it to say that the Vancouver city compost is going to be the unwilling recipient of 50 shards of corn tortilla, and that I had to start over again with the rolling with flour tortillas that I no longer think I should be eating because of a suspected gluten intolerance. Blah blah blah, we had amazing flour tortilla enchiladas. Really, really very good. Sorry no pics!
Go make this!
If you're interested, I used the day to prep food for the week because otherwise I resort to some pretty embarrassing eating choices when the week gets busy. So I put half the squash in the enchiladas (more would have definitely been overkill) and made a really simple and really tasty squash and carrot soup with the other half. Here's the deets.
Melt 1-2 Tbsp butter in a large soup pot.
Add 1 large onion, chopped. Reduce heat to medium-low, cover with a lid, and sweat onions for 5 minutes.
Add 3 large or 4 medium carrots cut into chunks. Stir, replace cover, and sweat for 10 to 15 minutes.
Add the flesh of half a roasted squash (any variety will do: acorn, festival, kuri, even pumpkin), and 3-4 cups vegetable broth and a dash of nutmeg. If you don't have broth then 3-4 cups water, a bay leaf, 1/2 tsp salt, 1/4 tsp black pepper, and possibly a drizzle of soy sauce.
Bring to a boil, then cover, reduce heat and simmer for 15 or so minutes. Add 1-2 tsp vinegar to taste like white wine vinegar or apple cider vinegar, or lemon juice.
Blitz until smooth with a hand blender, or in a blender or food processor. Adjust seasoning and viscosity to taste.
So we have a couple enchiladas left over and now a pot of soup that would feed four. Since there's two of us here, we have three meals in a minute to rely on during the week. Better than a kick in the head! Or certainly better than a kick at an empty tortilla bag. I promise.
Halve squash, rub with olive oil, place cut side down on baking tray and roast at 400F for 40 minutes.
Meanwhile, saute chopped onion, red pepper, and garlic in 2tsp olive oil over medium heat until veggies are translucent, then add 1 tsp cumin, 1 tsp chili powder, 1/2 tsp red chili flakes.
In a large bowl, mix together:
1/2 cup cottage cheese
1/2 cup salsa
1 small can black beans rinsed and drained (14oz maybe?)
1/4 cup chopped cilantro
1/4 cup corn (frozen then thawed)
sauteed veggies
flesh from half the roasted squash (discard skin)
I used fajita size flour tortillas, and greased a 9X13ish baking pan.
Place a bunch of mixture into a tortilla, roll up and put seam side down into the baking pan. Repeat. Mine made seven rolls but I definitely could have filled them less to make more rolls.
Pour some enchilada sauce from a jar (yep, you read that right) across the tortilla rolls, mostly down the middle and leaving the very ends of the rolls dry. Sprinkle the sauce with enough cheese to satisfy you.
Cover with foil and back at 350F for 30 minutes. Remove foil and bake another 10 minutes.
Ooooooh yeah! We'll be making these again, and soon! It should be said that I had a minor catastrophe with a pack of corn tortillas at first, which resulted in me cursing repeatedly and drop-kicking the empty bag of useless, crumbly, asswipe corn tortillas, which only resulted in greater frustration since an empty plastic tortilla bag really doesn't feel the brunt of a forceful drop-kick motivated by sincere anger. Suffice it to say that the Vancouver city compost is going to be the unwilling recipient of 50 shards of corn tortilla, and that I had to start over again with the rolling with flour tortillas that I no longer think I should be eating because of a suspected gluten intolerance. Blah blah blah, we had amazing flour tortilla enchiladas. Really, really very good. Sorry no pics!
Go make this!
If you're interested, I used the day to prep food for the week because otherwise I resort to some pretty embarrassing eating choices when the week gets busy. So I put half the squash in the enchiladas (more would have definitely been overkill) and made a really simple and really tasty squash and carrot soup with the other half. Here's the deets.
Melt 1-2 Tbsp butter in a large soup pot.
Add 1 large onion, chopped. Reduce heat to medium-low, cover with a lid, and sweat onions for 5 minutes.
Add 3 large or 4 medium carrots cut into chunks. Stir, replace cover, and sweat for 10 to 15 minutes.
Add the flesh of half a roasted squash (any variety will do: acorn, festival, kuri, even pumpkin), and 3-4 cups vegetable broth and a dash of nutmeg. If you don't have broth then 3-4 cups water, a bay leaf, 1/2 tsp salt, 1/4 tsp black pepper, and possibly a drizzle of soy sauce.
Bring to a boil, then cover, reduce heat and simmer for 15 or so minutes. Add 1-2 tsp vinegar to taste like white wine vinegar or apple cider vinegar, or lemon juice.
Blitz until smooth with a hand blender, or in a blender or food processor. Adjust seasoning and viscosity to taste.
So we have a couple enchiladas left over and now a pot of soup that would feed four. Since there's two of us here, we have three meals in a minute to rely on during the week. Better than a kick in the head! Or certainly better than a kick at an empty tortilla bag. I promise.
13.11.11
A blog in response
So hey folks, my sister has started a blog! A Blog About What documents the life of an awesome sister living in Edmonton, who has two freakin cute kids, a fabulous husband, a house, a job (currently on enviable mat-leave), an attitude (a good one!), and an interest in...well, a lot of things! So check it out if you have a minute. This post is in honour of Katho, and in response to her most recent post about pot roast. I hear ya on the warm, wintry foods, but I offer up a vegetarian alternative to the large hunk of beef*. BTW, how many references to your Irish heritage were made when you boiled beef, K? Very classic.
Our gorgeous fall meal tonight began with inspiration from the cutest squash you ever did see, the gem squash. Gem squash is a variety of summer squash, although around these parts it comes into season quite late for "summer". Last week at the Vancouver Farmer's Market - the Winter market, I should add - I found these little beauties, each about the size of an apple. I knew they would find their stuffing, and all I had to do was wait.
All week I've been meaning to make a batch of quinoa carrot muffins as made by Fresh 365. It calls for 1 cup of cooked quinoa, and today, although I didn't have all the ingredients for the muffins, I decided to make a batch of quinoa, save some for the muffins, and stuff the gem squash with the rest of it. Here's how it all went down.
*Every. Single. Time I tried to type beef in this post I managed instead to type beer. Freudian much?
Our gorgeous fall meal tonight began with inspiration from the cutest squash you ever did see, the gem squash. Gem squash is a variety of summer squash, although around these parts it comes into season quite late for "summer". Last week at the Vancouver Farmer's Market - the Winter market, I should add - I found these little beauties, each about the size of an apple. I knew they would find their stuffing, and all I had to do was wait.
All week I've been meaning to make a batch of quinoa carrot muffins as made by Fresh 365. It calls for 1 cup of cooked quinoa, and today, although I didn't have all the ingredients for the muffins, I decided to make a batch of quinoa, save some for the muffins, and stuff the gem squash with the rest of it. Here's how it all went down.
- I washed, halved, and seeded the squash. Gave them a light coating of olive oil and put them cut side down on a parchment lined baking sheet, and roasted them at 375 for 25 minutes.
- Meanwhile I cooked 1 cup of rinsed quinoa in 1.5 cups of veggie broth (like you would cook rice) for 15 minutes, then fluffed it with a fork.
- Also meanwhile, I roasted walnut halves in the toaster oven at 300 for about 8 minutes (a light toasting).
- In a bowl I mixed the quinoa (minus one cup) with about 1/2 cup of light ricotta that was hanging around, 1 tsp fresh thyme, 1/4 tsp ground sage, a few grinds of pepper, and the walnuts.
- I stuffed the squash halves with this mixture, topped them with a small sprinkling of cheddar (also hanging around), and returned them to the parchment lined sheet. At this point I also tossed a few cherry tomatoes with olive oil and put them on the same baking sheet.
- Baked all this at 350 for 25 minutes. Oozy gooey goodness! [Well, not really oozy. Tasty, but maybe more ooze would be nice. For this I would maybe mix in an egg to the quinoa ricotta mixture, or stir in grated cheese at the same step. Good, and lighter, without those changes, but really I would have appreciated some ooze.]
- While they baked, I sauteed green curly kale torn into bite-sized pieces in a little olive oil, and finished it with the lightest drizzle of balsamic vinegar when the kale was almost wilting.
*Every. Single. Time I tried to type beef in this post I managed instead to type beer. Freudian much?
6.9.11
Cookie and Kate
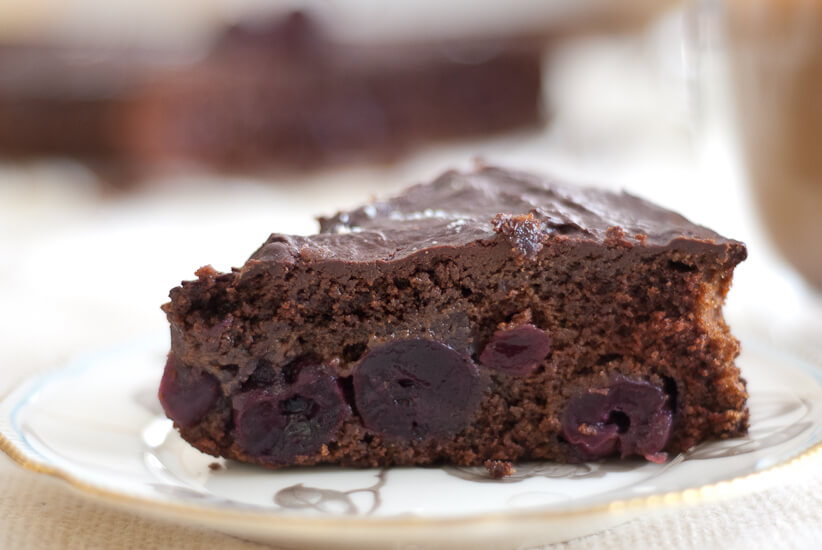
I've stumbled across yet another beautiful food blog, vegetarian and whole grain focused. She also worked for years as a bartender, and the recipes I've read on her site for fancy cocktails could turn any one of us into a foo-foo sippin' fool. If you have a minute, check out Cookie and Kate. I strongly suggest reading her healthful recipes, but if you only have a second then start at her fresh cherry chocolate cake. Omg. (picture by Kate)
5.9.11
Winnebago Man - Not family friendly!
This guy has me rolling in the aisles of my mini winni. Holy shit. Apparently he became a sensation when these outtakes from commercials in which he's the Winnebago spokesman surfaced on YouTube, and eventually someone even put together a documentary on him, called Winnebago Man. I haven't seen the documentary, but I'm thinking it just might be hilarious. Or sad, or hilariously sad. Or... well, you get the picture.
Goddammit.
PS. I really want to see the movie Duets. Has anyone seen it? Thumbs up? Thumbs down?
10.6.11
Taquito Tuesday! Or Thursday, or Saturday, or Anyday!
Last night I made taquitos for the first time, and I think it will be a stand by from now on. Moms, I bet this will be a great food for kids too. Finger food with nutritious fillings, and they're baked so can be quite low fat.
I adapted a recipe from She Runs, She Eats. In her taquitos she used sweet potato, which we in Canada would call yam, and in my taquitos I used pumpkin and black beans to get some protein in. Here we go!
First, chop 1 large onion quite small, and three cloves of garlic (or more to taste). Fry the onions in 1 Tbsp of oil in a non-stick skillet until translucent then add garlic for a minute or so. Then add:
2 Tbsp chili powder
2 tsp ground cumin
2 tsp ground coriander
1 Tbsp oregano
1 tsp salt
1/2 tsp black pepper
and stir, and cook for another minute until spices are fragrant. Remove from heat.
Meanwhile, mix up the main ingredients for the filling. I used 1 can of pumpkin puree and 1 can black beans (drained and rinsed), but you could use just about anything that will be moist and flavourful. The original recipe sauted cubes of yam until soft, then pureed them in a blender with the onions. In the future I want to make a sweet potato and bean version, or a refried bean and veggies version, maybe a cauliflower puree version with loads of cilantro, you could try mashed peas and soft potato, or even throw in some chopped hard boiled egg. You could change up the spicing too to be less hot, or try Indian spicing, or even Mediterranean. Obviously the carnivores could try shredded chicken or ground beef, but I won't condone such behaviour. ;-)
The point is, in a large bowl, mix up your main ingredients. Add onion mixture and 1 cup of shredded cheese (whatever cheese you prefer). Stir thoroughly.
Now comes the part that I imagined would be tricky but was actually shockingly easy. You get a stack of small corn tortillas. Heat your oven to about 275. Using spray oil, lightly spritz both sides of 6 or so tortillas and lay them on a baking try. Heat them in the oven for about 3-5 minutes. They will get soft and flexible. One at a time, remove from oven, place a heaping tablespoon of filling on the tortilla close to one edge. Roll tortilla up around the filling like a tight cigar. The tighter roll (and less filling) makes for a crunchier and more satisfying taquito.
Place your finished taquito on a baking try and set it aside. Continue this process with the rest of the tortillas until the filling runs out. My filling made about 20 taquitos. She Runs, She Eats has a good series of photos in her recipe post that kind of show how to roll them and what a filled tray looks like. From my experience, it's crazy easy, just make sure the rolled taquito is placed seam side down on the tray, and individual taquitos are not touching. This allows them to get evenly crunchy on all sides.
Bake at 450 for 15 minutes. Serve with salsa for dipping, and you're all set with a nutritious and delicious snack.
I adapted a recipe from She Runs, She Eats. In her taquitos she used sweet potato, which we in Canada would call yam, and in my taquitos I used pumpkin and black beans to get some protein in. Here we go!
First, chop 1 large onion quite small, and three cloves of garlic (or more to taste). Fry the onions in 1 Tbsp of oil in a non-stick skillet until translucent then add garlic for a minute or so. Then add:
2 Tbsp chili powder
2 tsp ground cumin
2 tsp ground coriander
1 Tbsp oregano
1 tsp salt
1/2 tsp black pepper
and stir, and cook for another minute until spices are fragrant. Remove from heat.
Meanwhile, mix up the main ingredients for the filling. I used 1 can of pumpkin puree and 1 can black beans (drained and rinsed), but you could use just about anything that will be moist and flavourful. The original recipe sauted cubes of yam until soft, then pureed them in a blender with the onions. In the future I want to make a sweet potato and bean version, or a refried bean and veggies version, maybe a cauliflower puree version with loads of cilantro, you could try mashed peas and soft potato, or even throw in some chopped hard boiled egg. You could change up the spicing too to be less hot, or try Indian spicing, or even Mediterranean. Obviously the carnivores could try shredded chicken or ground beef, but I won't condone such behaviour. ;-)
The point is, in a large bowl, mix up your main ingredients. Add onion mixture and 1 cup of shredded cheese (whatever cheese you prefer). Stir thoroughly.
Now comes the part that I imagined would be tricky but was actually shockingly easy. You get a stack of small corn tortillas. Heat your oven to about 275. Using spray oil, lightly spritz both sides of 6 or so tortillas and lay them on a baking try. Heat them in the oven for about 3-5 minutes. They will get soft and flexible. One at a time, remove from oven, place a heaping tablespoon of filling on the tortilla close to one edge. Roll tortilla up around the filling like a tight cigar. The tighter roll (and less filling) makes for a crunchier and more satisfying taquito.
Place your finished taquito on a baking try and set it aside. Continue this process with the rest of the tortillas until the filling runs out. My filling made about 20 taquitos. She Runs, She Eats has a good series of photos in her recipe post that kind of show how to roll them and what a filled tray looks like. From my experience, it's crazy easy, just make sure the rolled taquito is placed seam side down on the tray, and individual taquitos are not touching. This allows them to get evenly crunchy on all sides.
Bake at 450 for 15 minutes. Serve with salsa for dipping, and you're all set with a nutritious and delicious snack.
7.6.11
Subscribe to:
Posts (Atom)